Being interested in tinkering projects and having recently seen Plasma2002’s excellent Emergency Party Button for the first time I was immediately set on having to recreate a similar project for myself.
As with the original, it was obvious that the look of the box & room are vital, as most of our living room furniture’s oak this meant having to build my own box to house the button, and I’ve also tried to keep elements of the “party” hidden from view as much as possible so there’s absolutely no clue as to what the button will do before it’s pressed.

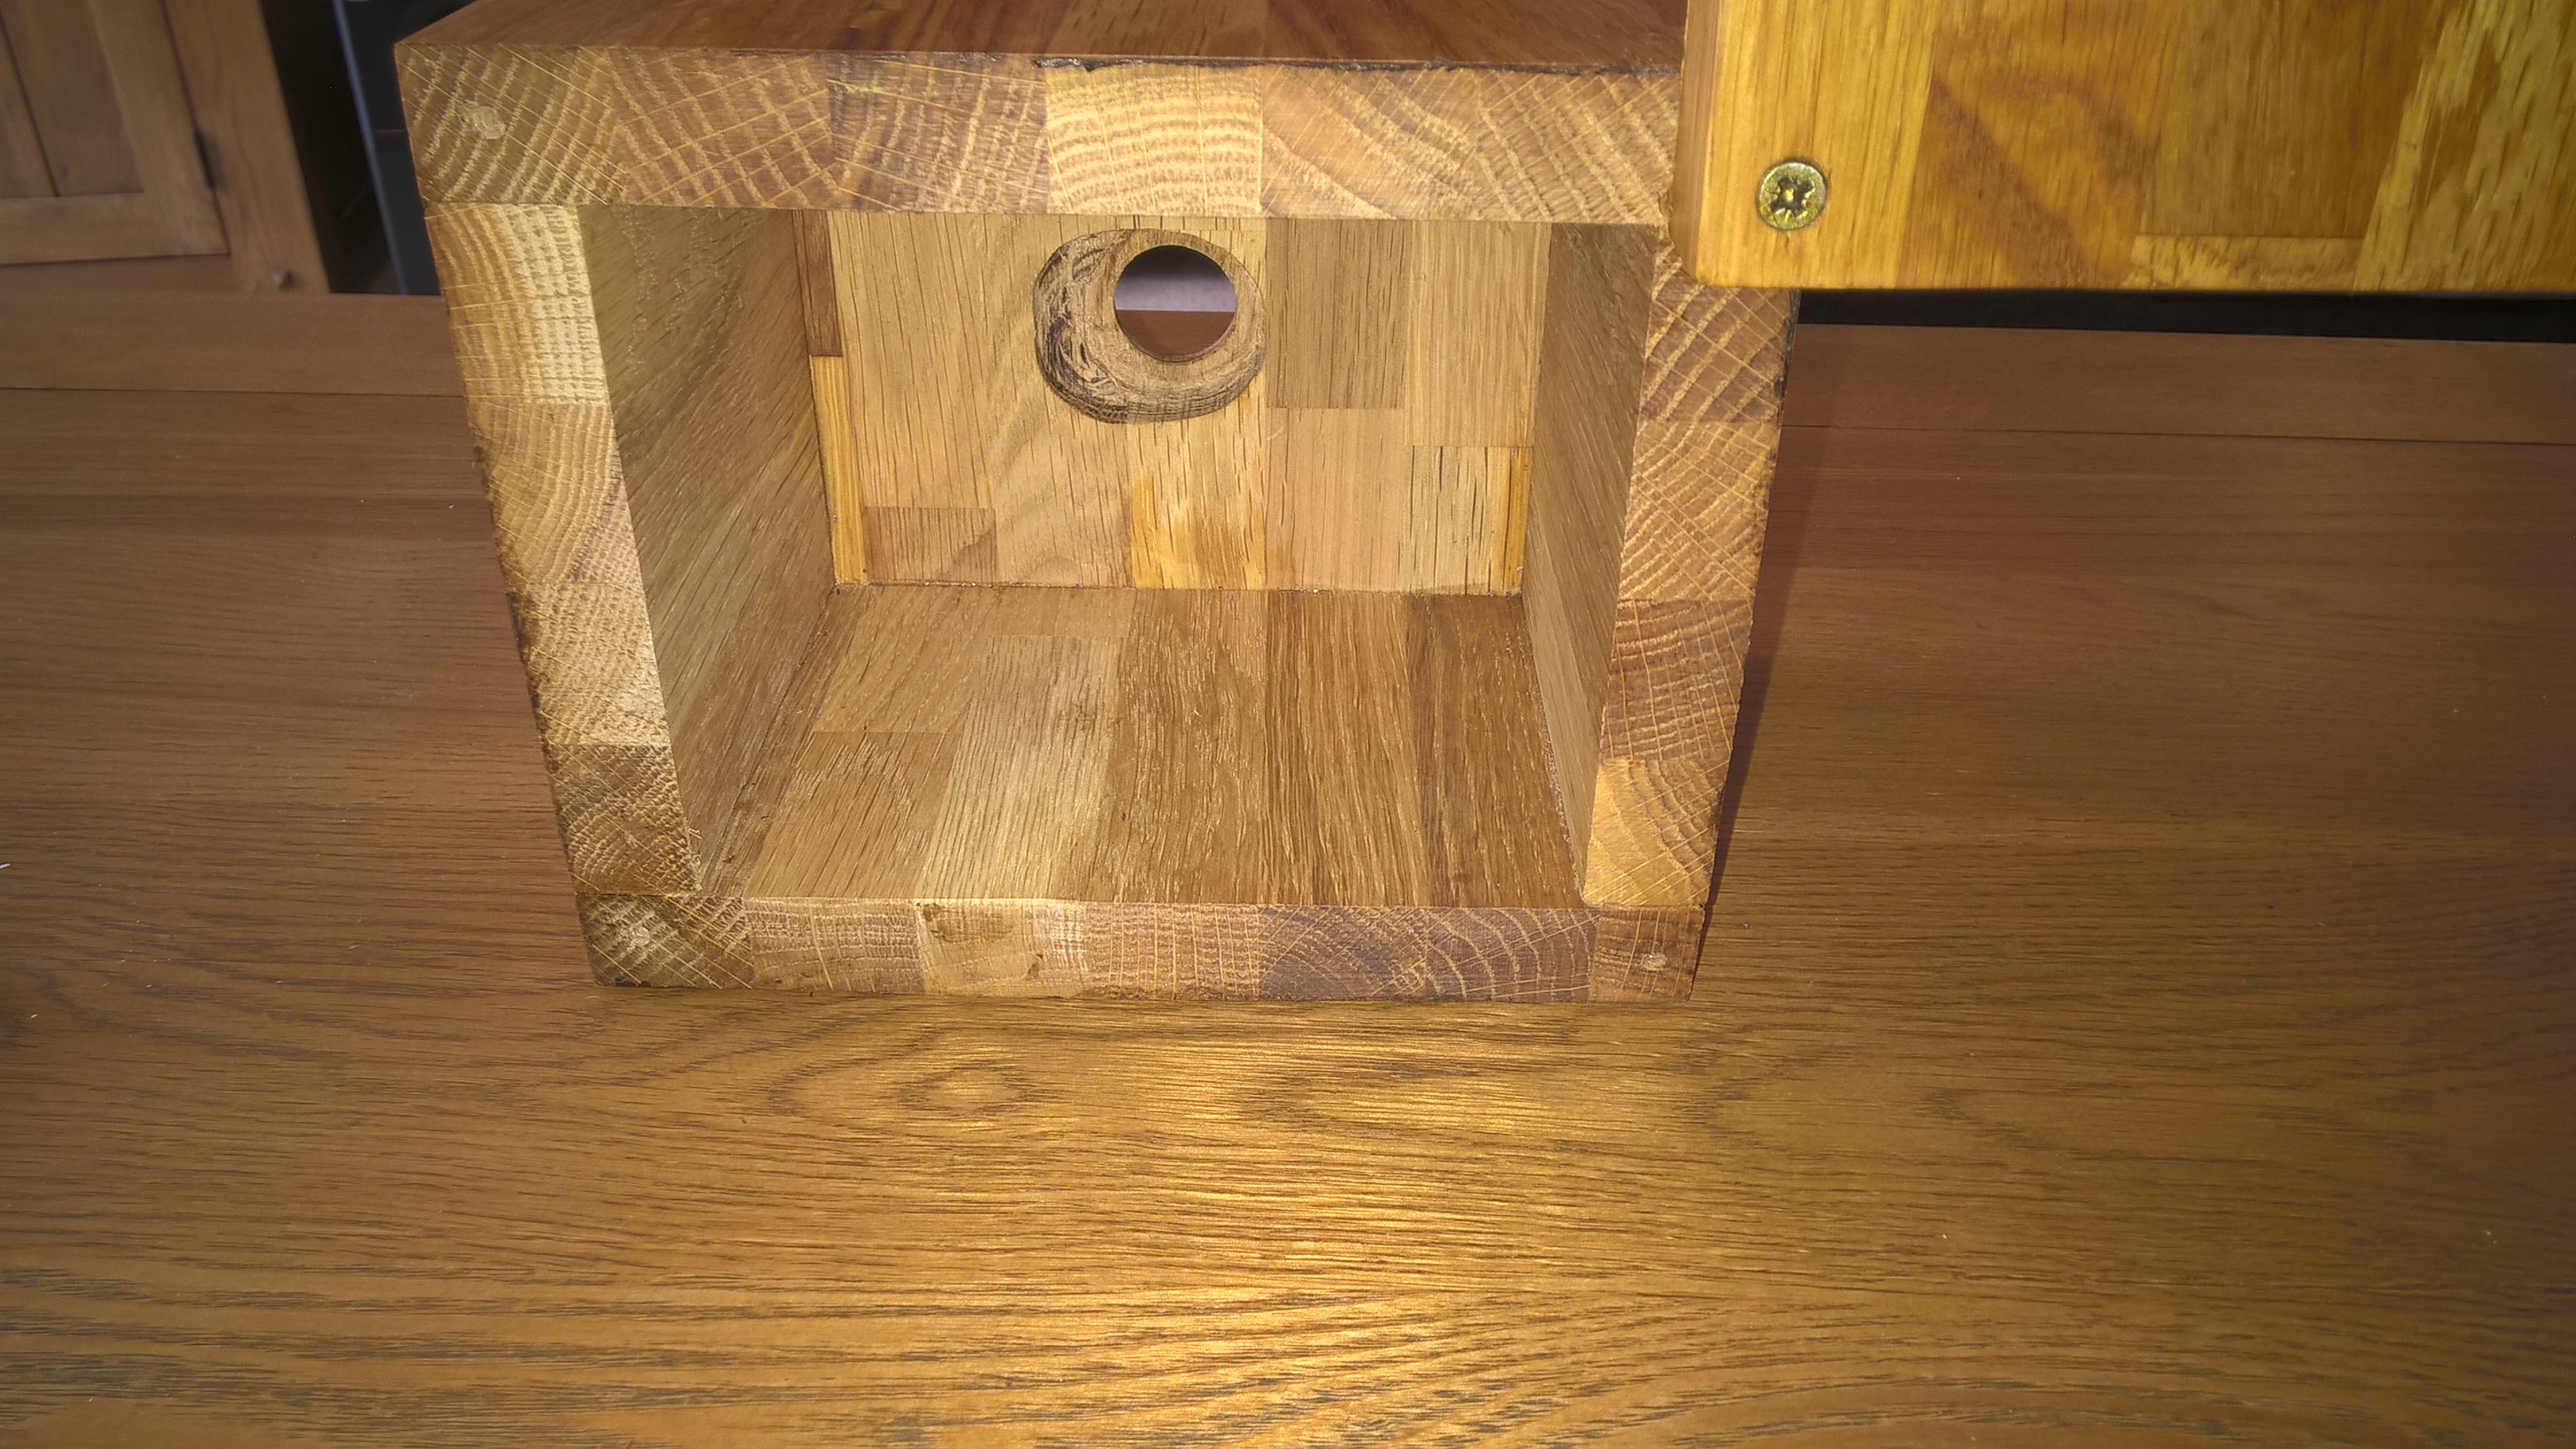
The button’s housing is a hollow oak box simply using 6 hand-cut pieces of oak – The resulting box is a very heavy solid piece of wood which fits in with the general look of our furniture. I would have liked to make it slightly smaller than it is but a lot of the bulk is thanks to the wood’s 19mm thickness, and I couldn’t readily find any planed oak I liked that was significantly thinner than this. I still have my eyes open though, so may end up building a new, slightly smaller housing if I find any.
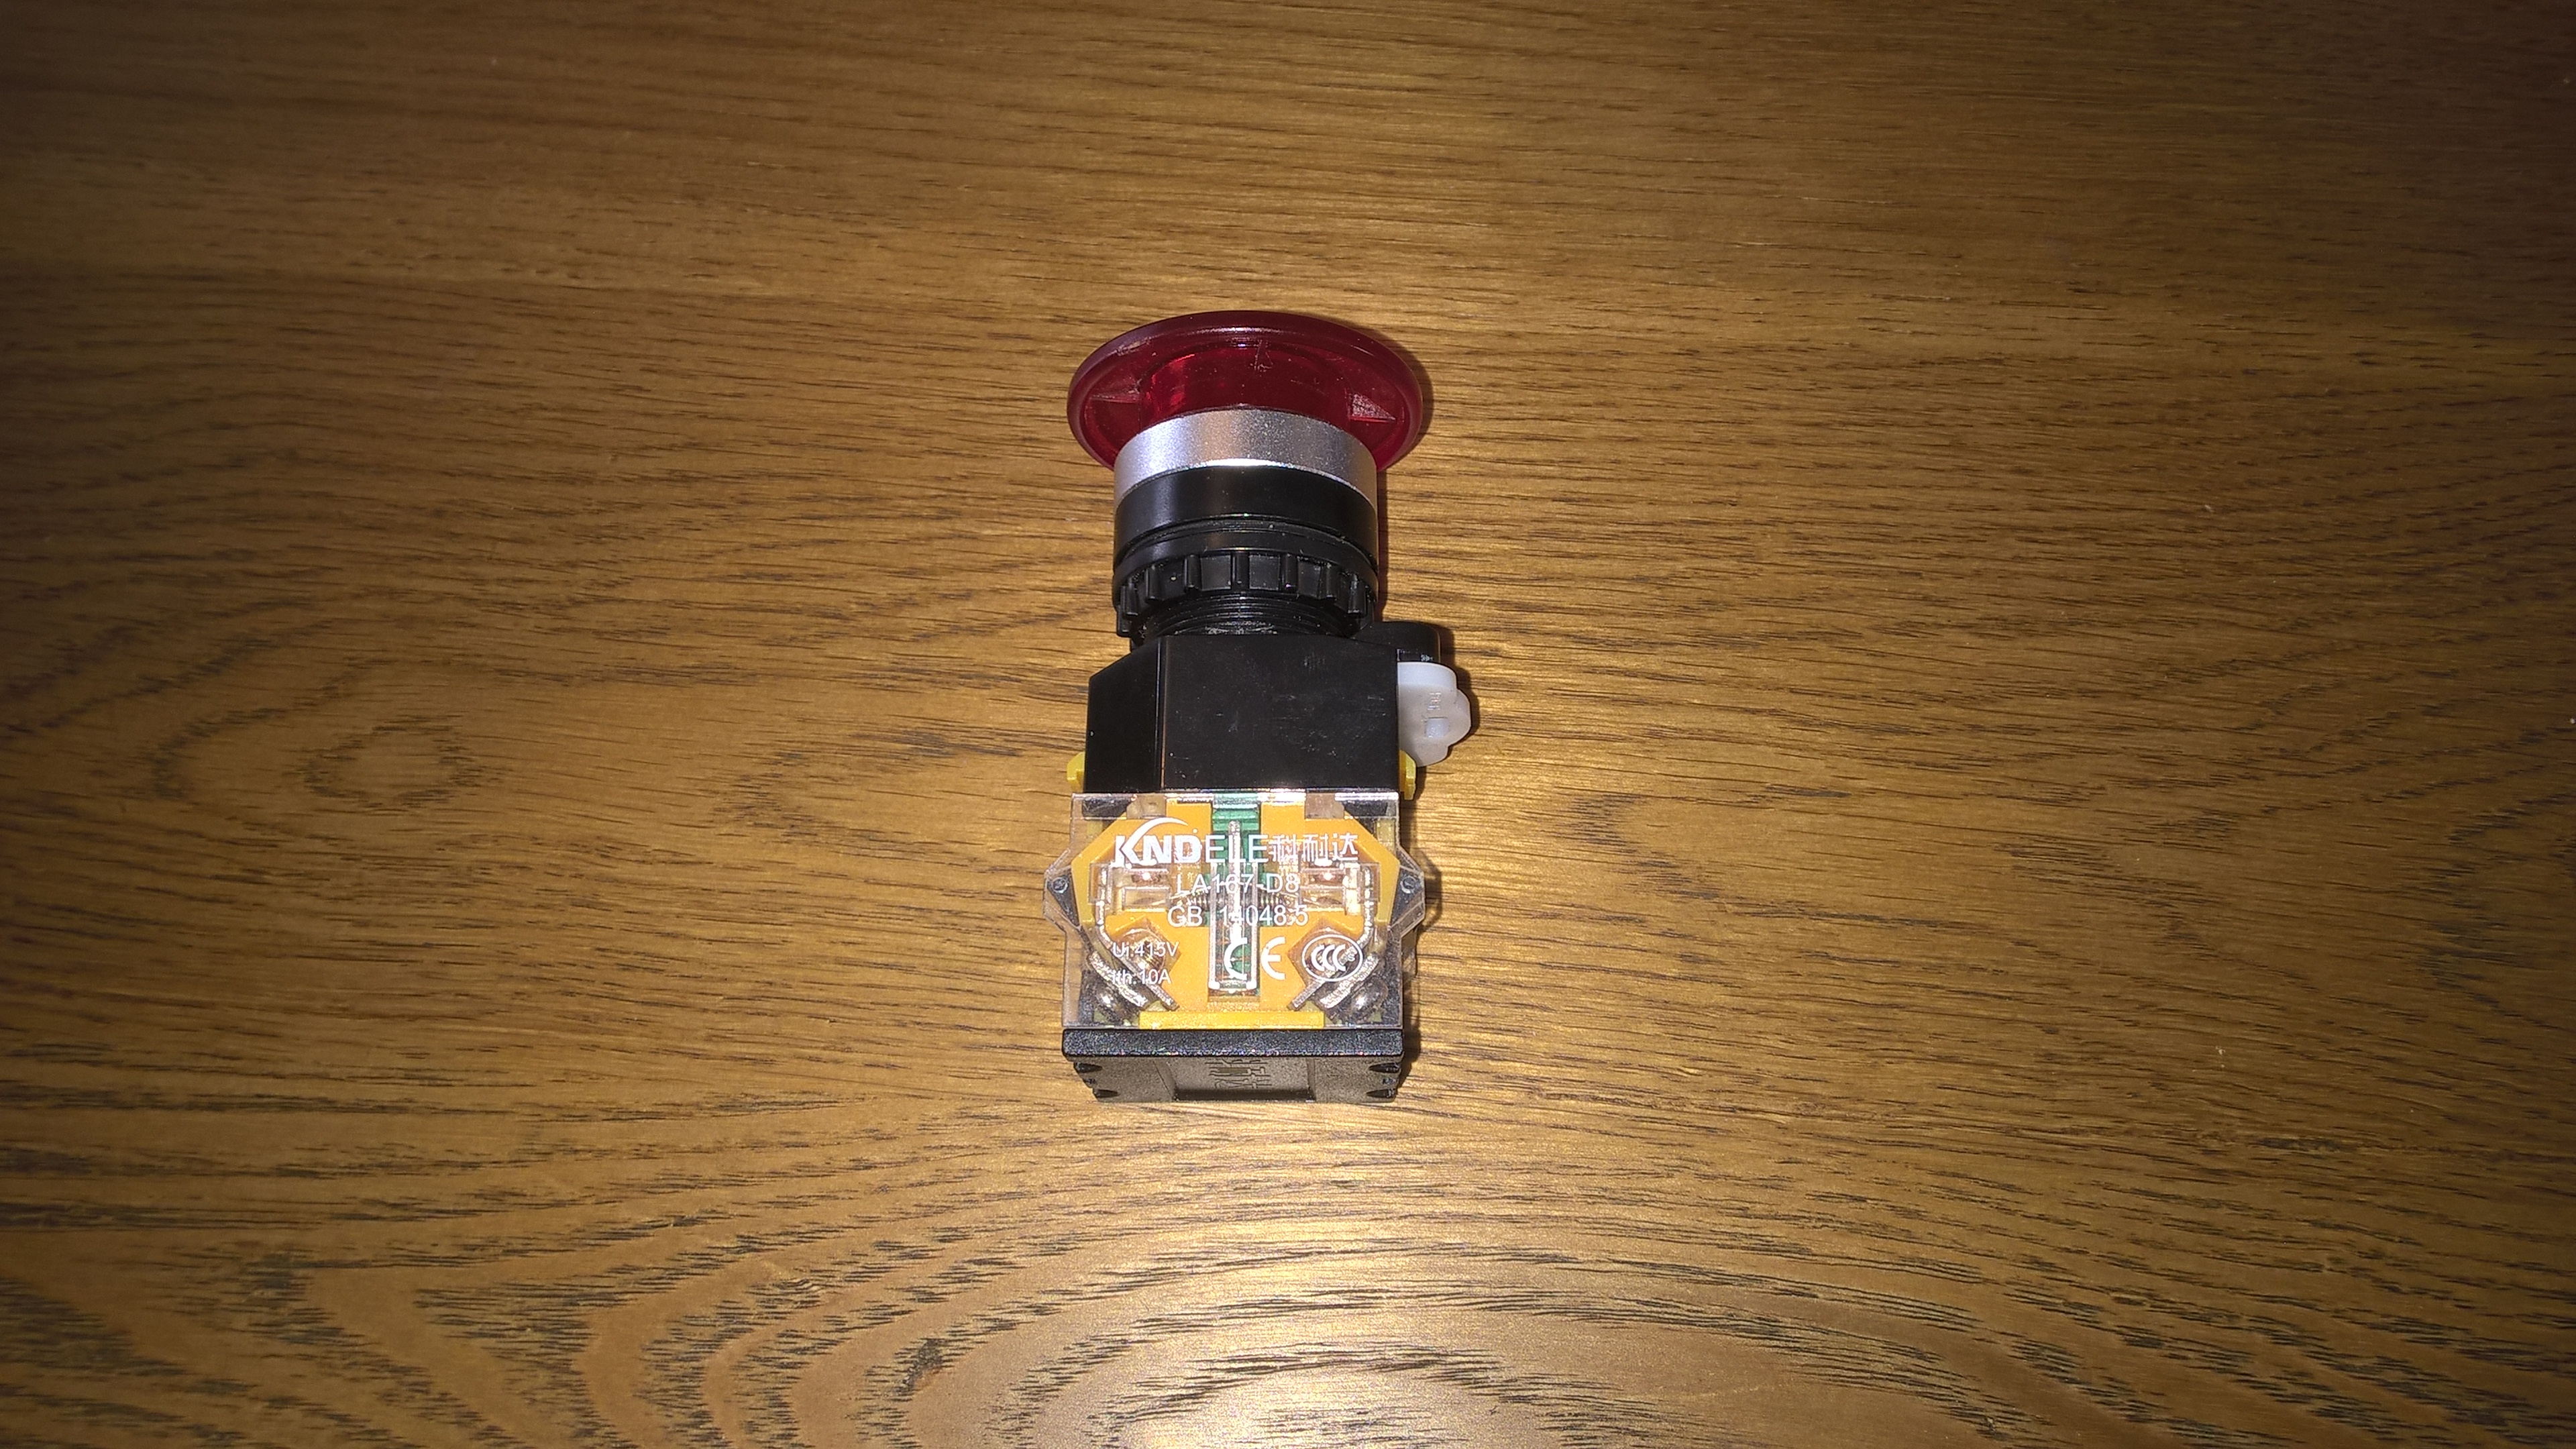
The button itself is a Momentary button with both NO and NC terminals, though for my purposes only the NO terminals are needed. I couldn’t readily find any red buttons locally so ended up turning to Ebay and had various different buttons delivered from China.
The button I’ve ended up using is slightly smaller and less substantial than some others but does have a very satisfying and solid-feeling click when pushed, most of the other buttons I tested were kind of mushy which spoiled the effect.

The brains of the operation is a Raspberry Pi 2 B – There are various options these days for controlling the button (everything from an Arduino to a Particle Photon to the guts of an Amazon Dash button) but I chose a Pi for 2 reasons:
Firstly, I had one handy. Reducing cost is always a bonus when trying to justify this whole project to the other half!
Secondly, when planning out the project I had intended to have the button and its brains self-contained and running/controlling everything itself. This meant I needed something straightforward to code against the various APIs of all the party equipment and that has enough guts to do so quickly (particularly important for the main lights).
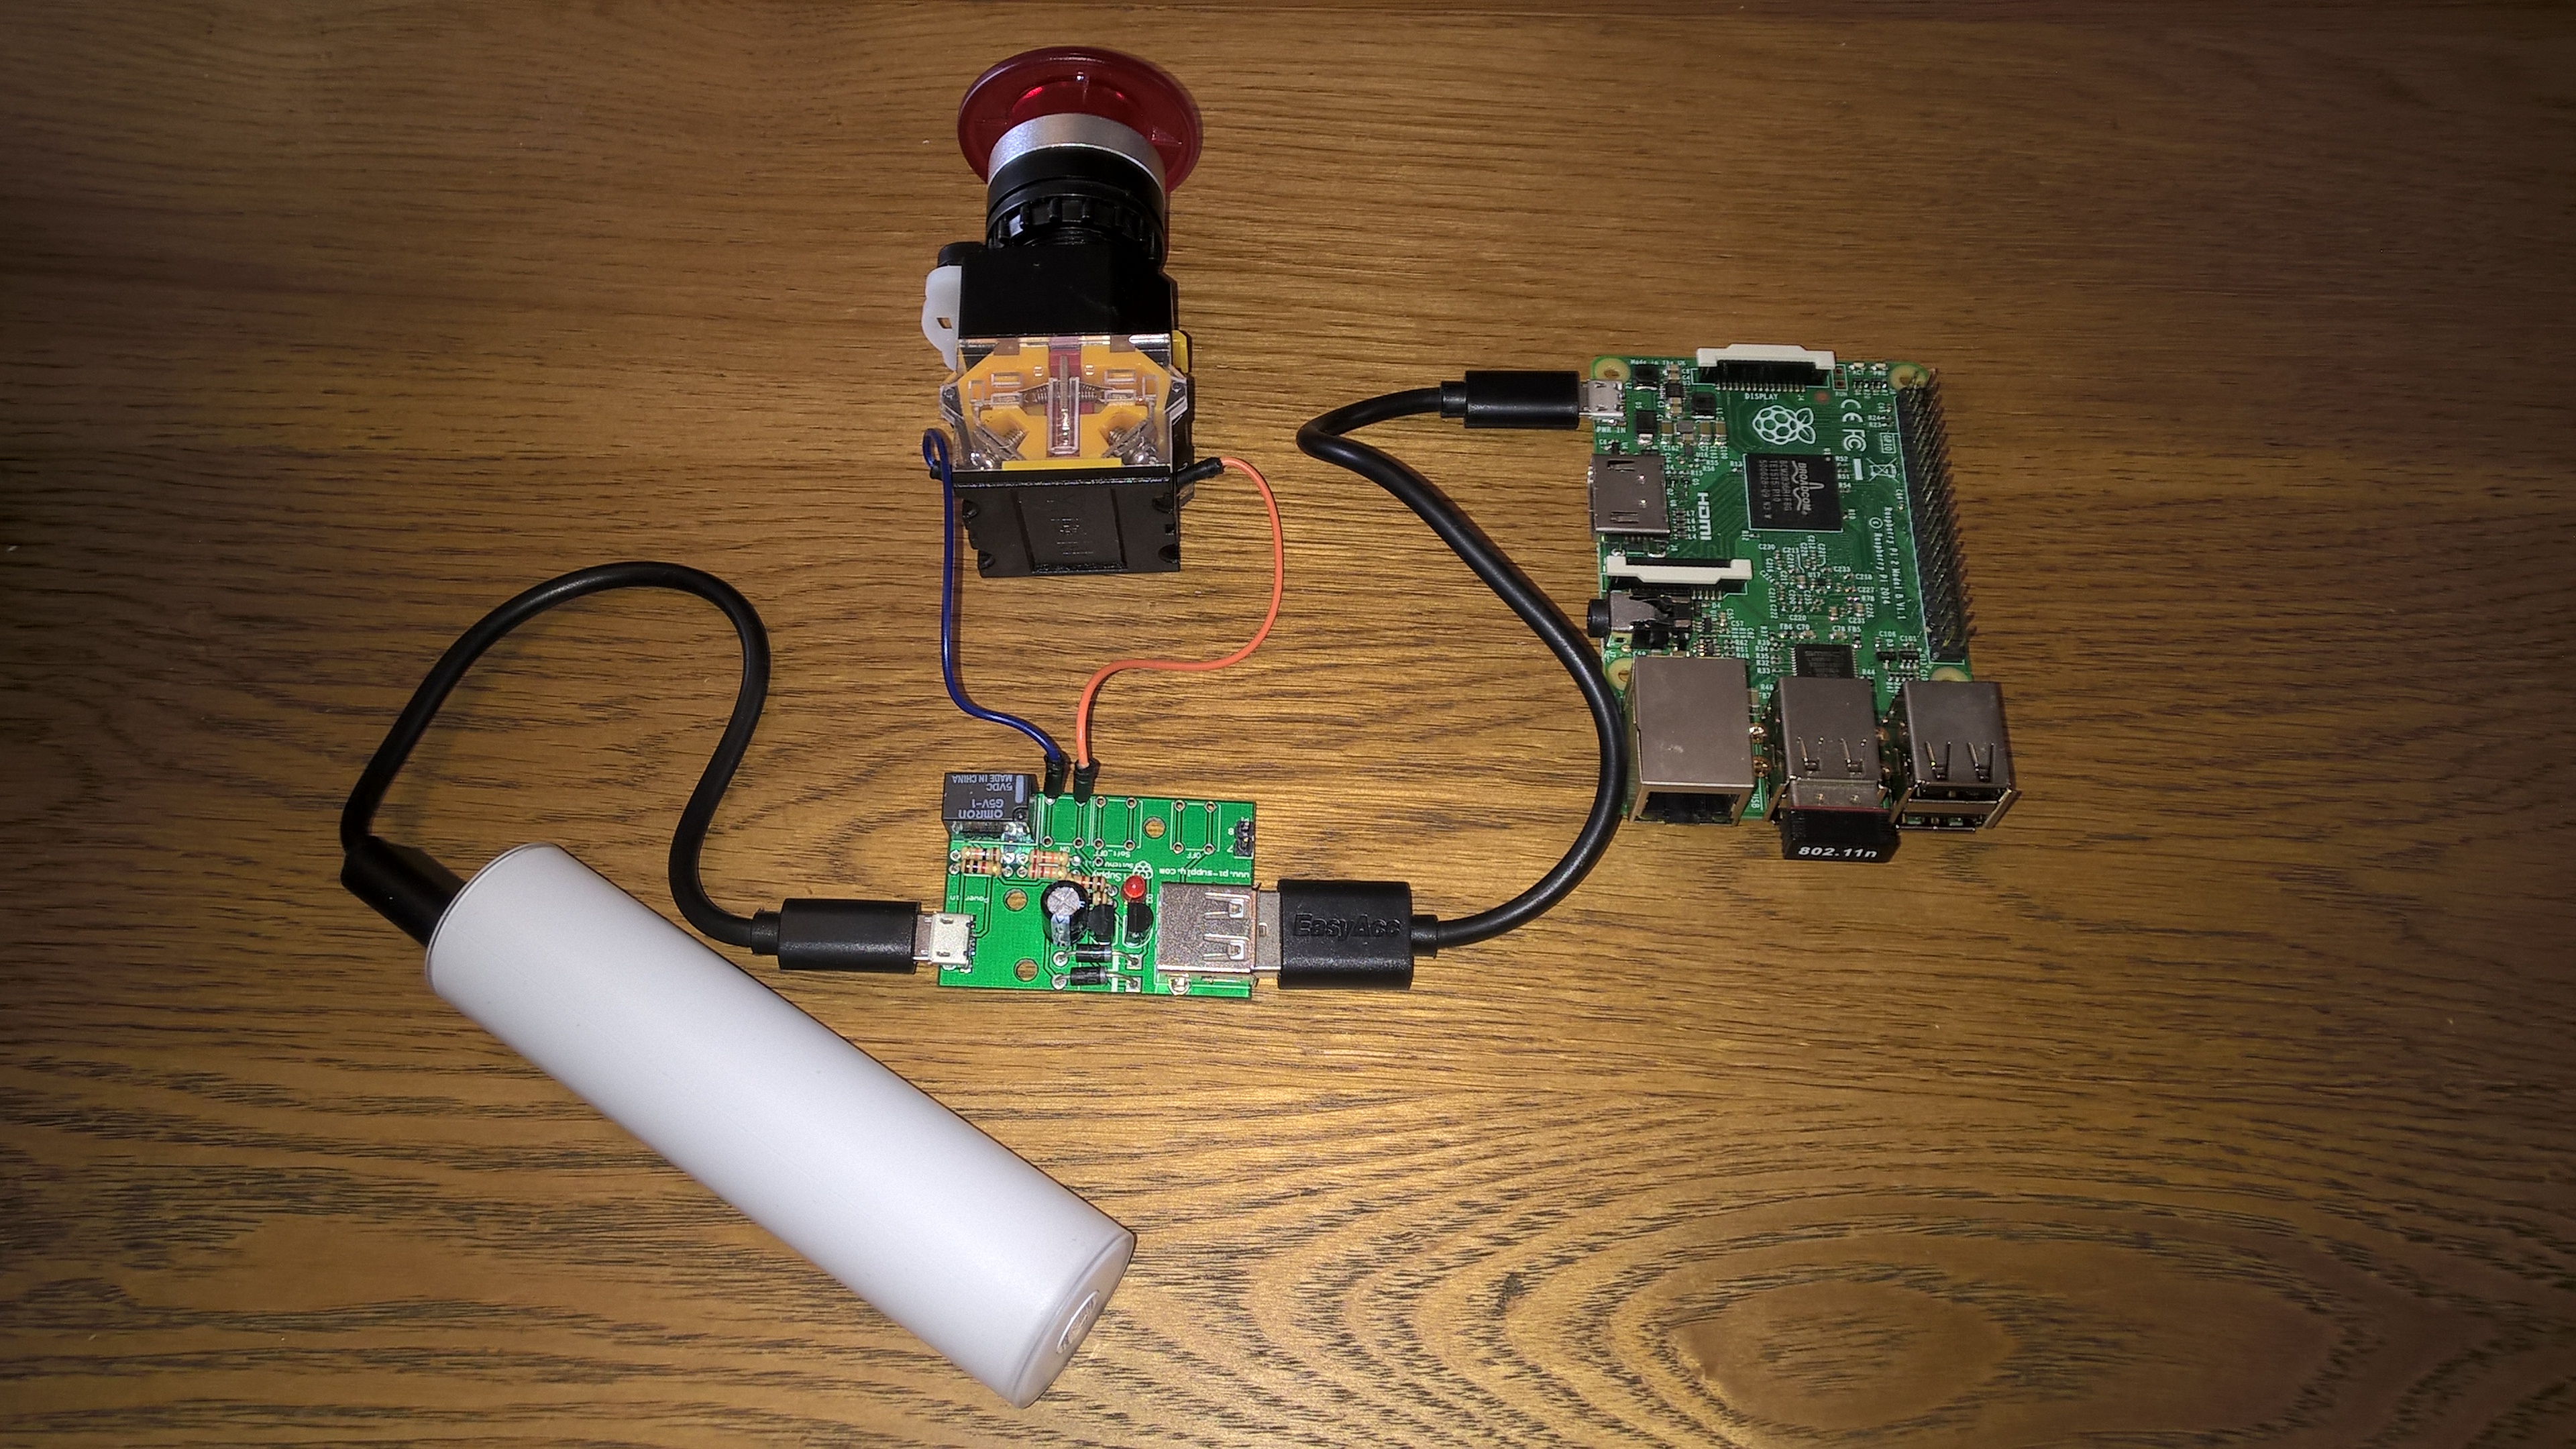
The Raspberry Pi is powered by a Nokia DC-19 battery pack – This is an older and fairly expensive pack with only moderate capacity but the type of battery pack used is important (not just for size, as the Nokia one is physically smaller than most and its length is what dictates the length of the box).
Most modern battery packs aimed at recharging phones etc have power-saving sleep circuitry which means that if the draw on the battery is either zero or very low, the battery shuts itself down entirely and can only be woken back up by replugging the cable or pressing a button on the battery pack itself.
Obviously neither of these are particularly practical when the pack is sealed inside a box so I had to sort out a battery with no sleep function.
I could have built one by hand using some Lithium batteries and charging/regulating circuitry but through an obscure forum thread from several years ago found out that this particular Nokia battery doesn’t shut itself off, so this turned out to be perfect for my needs. (The only USB battery packs I could readily find which actively advertise having the capability of being “always-on” are made by Voltaic but they aren’t readily available to buy in the UK).
Between the Pi and the battery sits a Pi Supply Switch – This little circuit provides the interface needed between the button itself and the Pi’s power supply. When the button is pressed and its NO terminals close the switch provides power to the Pi, the Pi boots, connects to my Wifi network, and starts making things happening.
Additionally however as the Raspberry Pi has no built-in way of powering itself off entirely (the best it can do when being halted is going into a deep-sleep mode which is still drawing power) this switching circuit will cut off power to the Pi entirely approximately 2 minutes after it’s shutdown, which means both that it’s not needlessly drawing power constantly and that it’s ready to be powered back on from cold the next time the button’s pressed.

Also inside the box are a few pieces of foam to pad out the gaps, this prevents the electronics from rattling around when inquisitive people give the box a good shake before pressing the button!
Once the button is pressed and the Pi boots it currently remotely executes a script running on a VM on my desktop and this VM then handles the running of everything.
This VM is not necessary however and it’s currently set up this way so that I can continually update the scripting/choreograph new songs without having to power up the Pi constantly – Once everything is “done” however (if it ever is!) the code running on the VM can be directly transplanted onto the Pi, then the Pi altered to run the code locally instead of triggering it via the remote VM, which makes everything neat and self-contained.
The code being executed to run everything is a fairly dirty mix of Bash and Python which is firing JSON and XML requests to the various devices’ API’s but broadly it’s doing the following:
Checking whether the AV receiver is already powered on or not – The receiver takes around 4 seconds to power up so the timing of lights/music has to be adjusted depending on whether it’s already on
Turn off the TV – As most modern TVs are network connected with their own remote control API’s this is just firing an “off” signal to the TV, so that it turns off for the party.
Choose the configured song – I’ve choreographed a number of different songs, the script has to adjust it’s timing depending on which song is going to start.
Turn on the AV receiver if it isn’t already on, then once it’s powered up select the music source (my music is currently on a USB stick plugged into the receiver, this loads more quickly than streaming it over the network), set the volume to a preconfigured level, and start playing music.
At the same time as the AV receiver is powering up, a signal is sent to the lights to dim or turn off the lights (depending on the song being played).
During the song, constant API signals are being sent to the lights to control every aspect of their timing/colour/saturation/brightness
When appropriate separate signals are sent to 3 Wemo switches which control the laser projector, strobe light, and smoke machine to power them on/off as needed.

The ceiling and standard lights consist of three Philips Hue bulbs – There are a number of Kickstarted smart bulb options available these days but I opted for Hue because they’ve been around a while and support for them is fairly ubiquitous.
They have a good balance between everyday use and “party time” as they produce a good range of whites for normal use and are reasonably bright.
For their choreography I’m basically firing a huge stream of JSON requests to them via cURL to control every change in brightness, colour, saturation throughout the party separately.
The bulbs (or the hub, I’m not sure which) do have a limitation here in that when controlling individual bulbs if you attempt to consistently send commands to them with less than a 0.1 second gap between each, they get a bit unreliable and will start to either queue and delay processing the changes, or skip them altogether.
This therefore puts a limit on the choreography of only being able to reliably make lighting changes roughly every 1/10th of a second, I’m not sure whether other similar bulbs (such as LIFX) might be able to work a bit faster than this.
These Hue bulbs are also not very good at producing greens, they can do light yellowish green but not deep dark greens. I assume this is just a limitation of the not-quite-RGB LEDs the Hue bulbs use.

The strobe I’m using is a simple, cheap strobe that has basic adjustable timing and will run whenever it’s powered on. It also came with 3 basic filters to change the strobe colour to blue/orange/red to mix things up a bit.
In the quest for keeping things neat, the strobe is blu-tack’d to the back of the TV so that it’s completely hidden and out of the way. The strobe doesn’t weigh much so the blu-tack is holding it well for now, I may consider a more semi-permanent fixing (such as Sugru) if it does end up not being able to hold the strobe long-term.

The laser is also a cheap unit with basic controls to adjust the pattern speed along with having it always-on or pulsing with music (though I have the latter disabled) and like the strobe will simply start running when power is turned on.
This is sitting on a bookshelf behind an arm of the sofa to keep it reasonably hidden while having as wide as possible access to the ceiling.

This is basically a plasma ball but in the shape of a lava lamp, it’s difficult to get a decent-looking photo of it when it’s on but it basically gives of bluey-purply lightning and is great fun to run your fingers/hands over, as the effect will be drawn to wherever you make contact with the glass.

Another cheap-as-possible piece of kit, the smoke machine (shown removed from it’s usual cubby-hole next to the arm of a sofa, below/next to the laser) is fairly specific – Most cheap smoke machines have a wired remote with a push-button which will only generate smoke while the button is actively being held, which isn’t a lot of good for automation (and DMX controllable ones are several times more expensive).
This particular unit however has a button which stays on when pressed, which means that for basic automation the button can be left on and the machine controlled by turning on/off the power – When the machine gets power, it’ll heat up then immediately start discharging smoke.
As a future addition I’m considering replacing the remote entirely with a controllable relay of my own so that I can more finely control smoke production separately from just powering on/off the machine, but this’ll do for now.
I’ve also added some vanilla fog armoa oil to the fog juice used by the machine, so when the party gets a blast of smoke it smells nicely of vanilla.
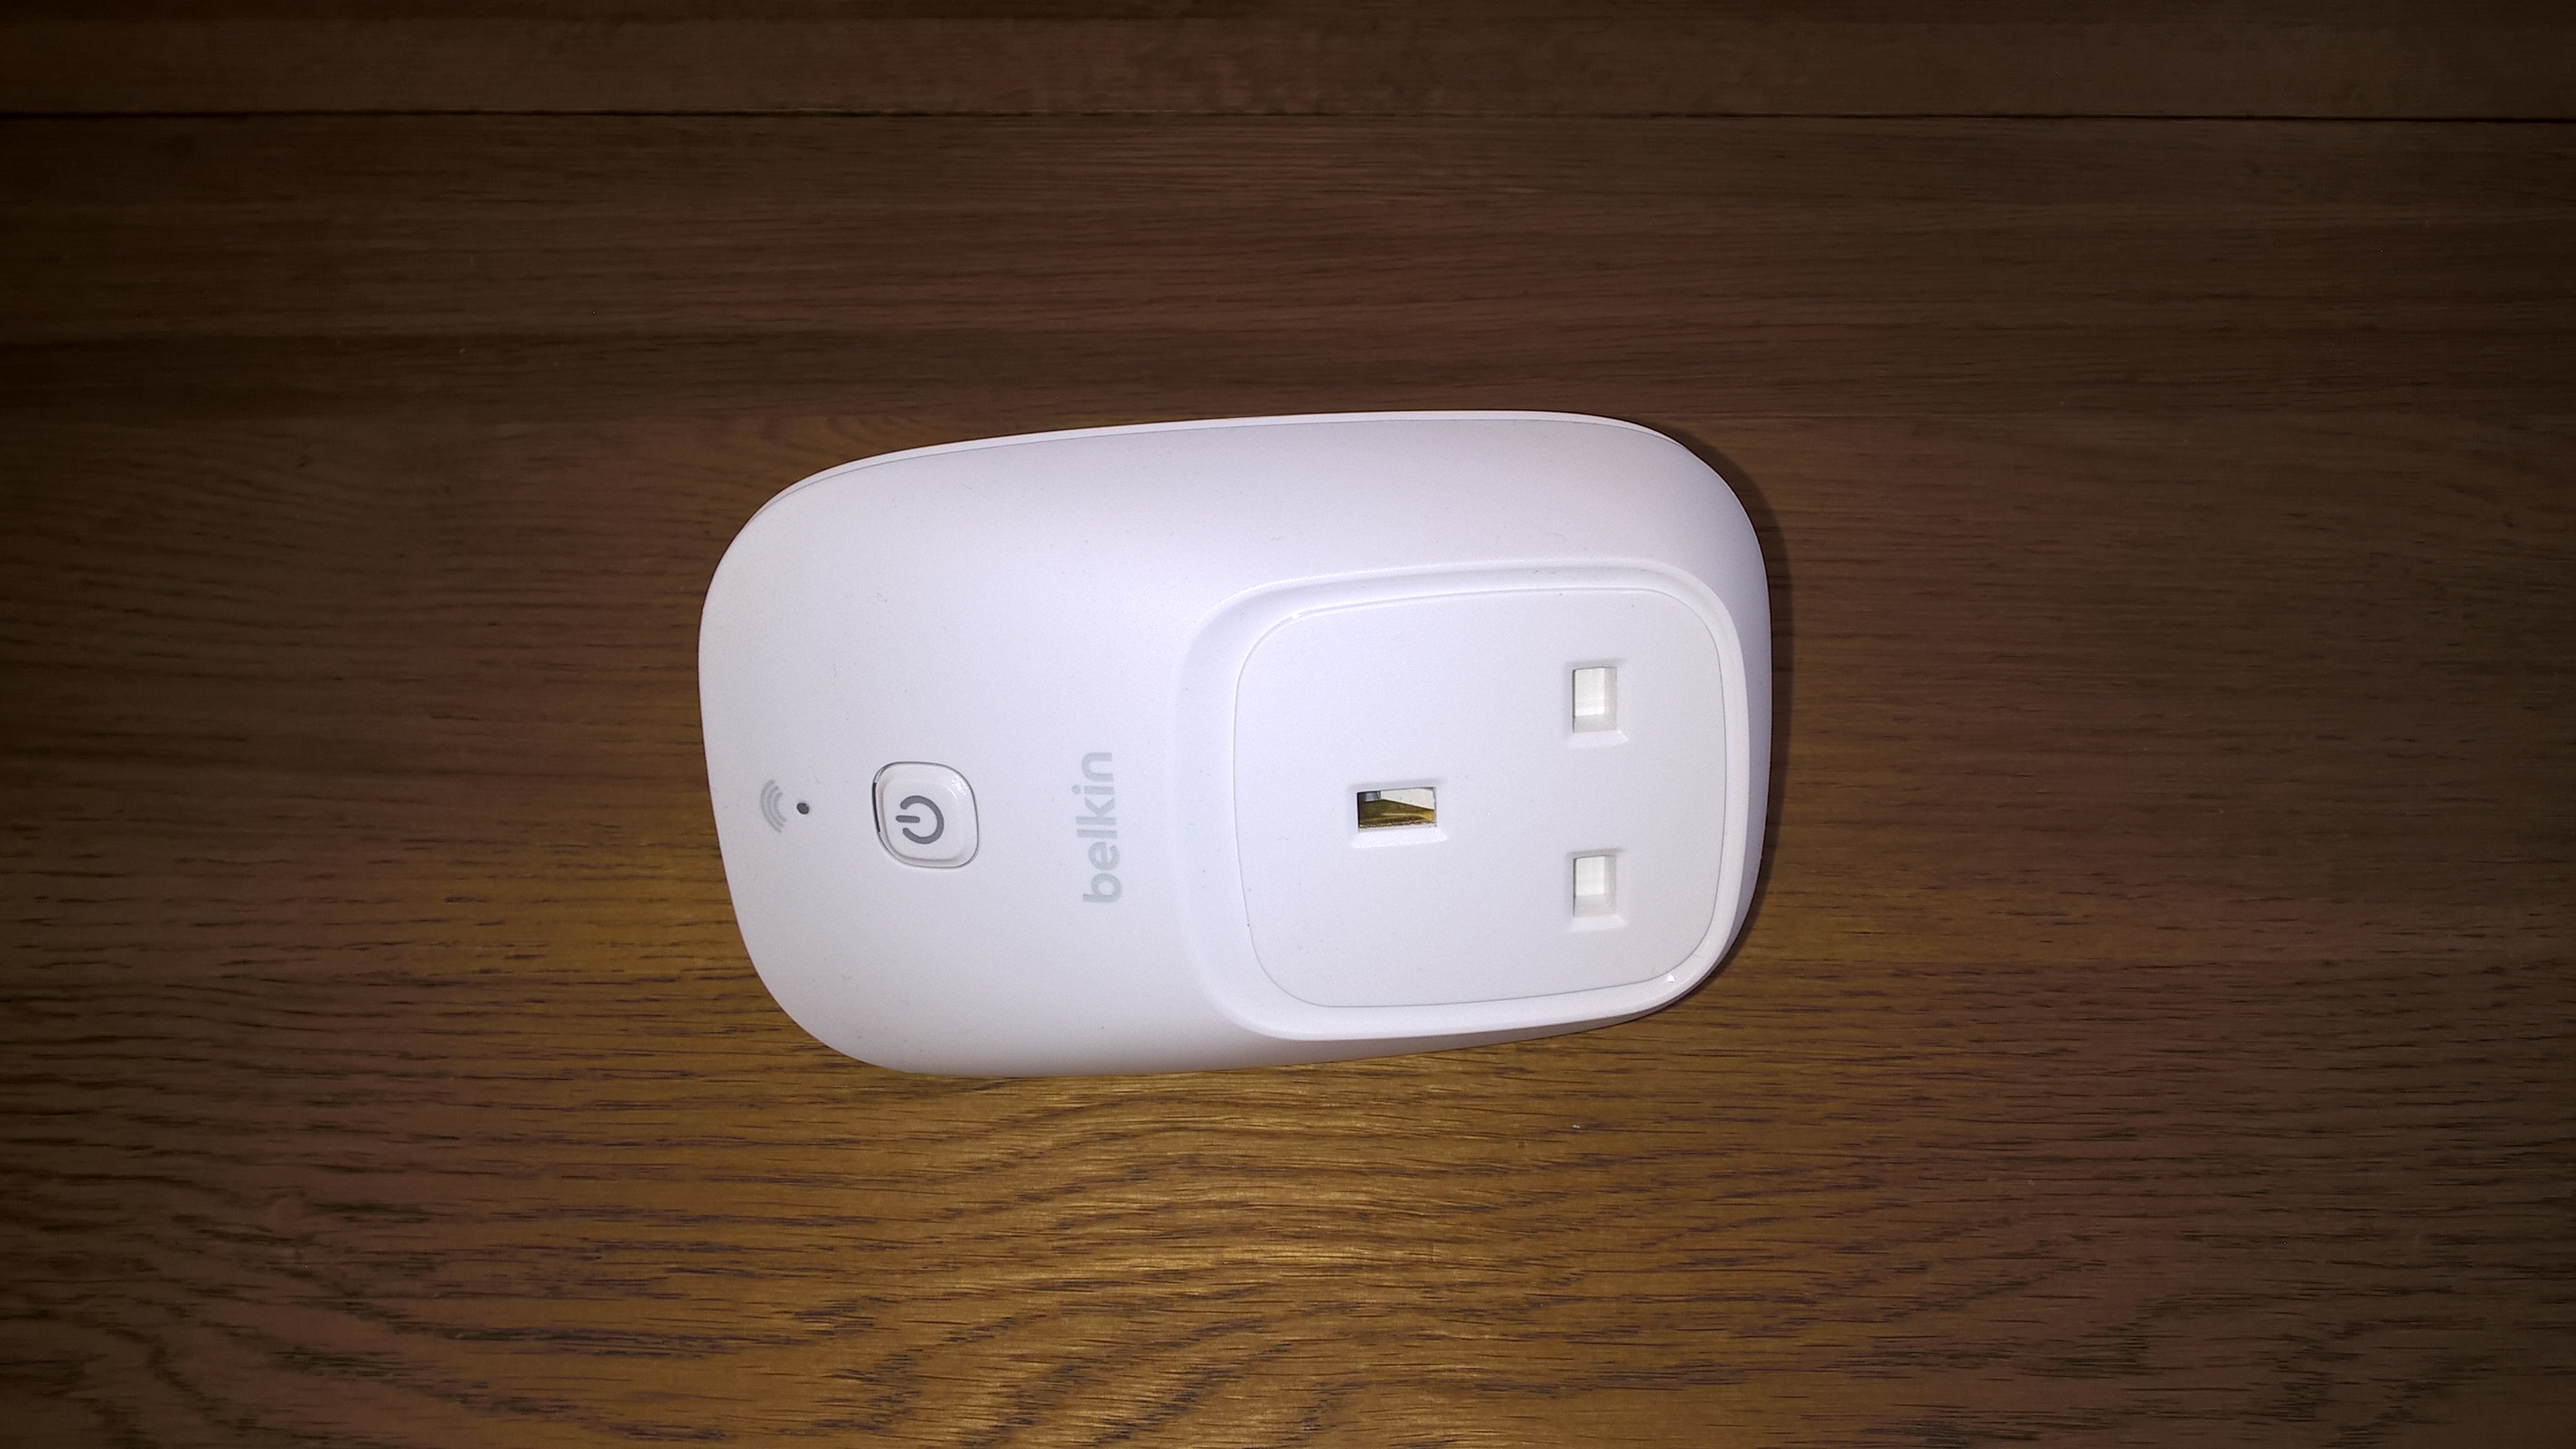
The strobe, laser projector, plasma lamp and smoke machine are all dumb units being turned on/off via their power switches, and these are all handled by Belkin WeMo units – These are well-supported power sockets that’re very easy to code for (although they are fairly expensive), and are simply being switched on/off throughout the party by XML requests via cURL.
Raspberry Pi 2 B – Available from any number of retailers, costs around £30.
MicroSD card – Used for system storage with the Pi, I used a 16GB Class 10 SanDisk, an 8GB card is more than large enough but there’s barely any difference in price. Using a good, fast card is essential. Costs around £5.
Nano WiFi Adaptor – Used to provide WiFi for the Pi – Most adaptors are compatible with the Pi but some can be easier or harder to setup, this particular one is one of the easy ones. Costs around £5.
Pi Supply Switch – Used to control power for the Pi, note that this is supplied in kit form so a soldering iron is essential, the board is very straightforward to solder though. Costs £15.
Battery Pack – I used a Nokia DC-19 because it’s small and always-on (see above), available from various retailers (though no idea how much longer for as it’s quite an old product) for around £25.
The Button – Various options for the button, ultimately it needs to be a Momentary button with NO terminals. The button I ended up using cost £2.72.
Wood for the box – I used a sheet of Oak Hobbyboard from my local Homebase, the board is just about large enough to make 2 boxes so is plenty big enough to get well-cut pieces needed for 1. Cost around £10.
Hue Bulbs – These are available as a starter kit with 3 bulbs and the required hub to control them, available from various retailers for £150.
Strobe Light – I’m using a QTX Mini Party Strobe, there are various similar strobes available at similar prices. Cost around £13.
Laser Projector – This is another fairly generic item and there are many available fairly cheaply which project different patterns. Cost around £10.
Smoke Machine – I’m using a 1byone 400w Mini Fog Machine, there are various cheap smoke machines available but this is the only one I could readily find with a wired remote button that stays on when pressed, essential to automate it without having to rig up a separate relay system. Cost £33.
Fog Juice – Lots of different types of fog juice available, I’m using QTX High Grade. Ensure the juice you use is suitable for your fog machine, some really dense juices are intended for more powerful >1000w machines. I have a 5 litre tub, which will last *ages*. Cost £14.
Fog Aroma – Various flavours available, I’m using Vanilla. Cost around £4.50.
Belkin WeMo Switch – There are various cheaper offbrand wifi switches available but the Belkin switch is the best-supported that I could easily find a straightforward API to code against. I’ve used 3 of these (1 for the strobe, 1 for the smoke machine, and 1 with a plug splitter for the laser + plasma lamp). Available from various retailers, cost around £40 so £120 for the three.
Cost of the above: £437.22
The elephant in the room is then the AV receiver. There are of course various ways to handle actually making music but I’m using a Yamaha RX-V677 which costs around £250.
There are cheaper (and much much more expensive) alternatives, you essentially just need a network-connected receiver which has a control API (the network-capable models of all major brands have API’s readily available) and network standby capability (so that you can turn it on over WiFi while its in standby).
Optionally, an always-on PC is needed to act as the control server to hook everything together. The Pi in the box can do this job, but I’m currently finding things more straightforward with this task offloaded to a PC.
I’ve choreographed the party button for a number of songs (for complex songs the process of choreographing all the lights takes an *age*).
For now, here are videos of the button in its original party mode:
And in scary Dramatic mode:
[like]
That’s awesome you’re a fucking genius